Over the last few weeks I have been playing the new banjo and getting used to it. I had some ideas about it that I thought might be of interest.
My stated goal at the beginning of the project was to make a duplicate of my large gourd banjo, but with a wooden hoop instead of the gourd. That was to make the banjo a bit easier to hold and play. So I took a photograph of the two banjos side by side to see how I had done.
Here they are.
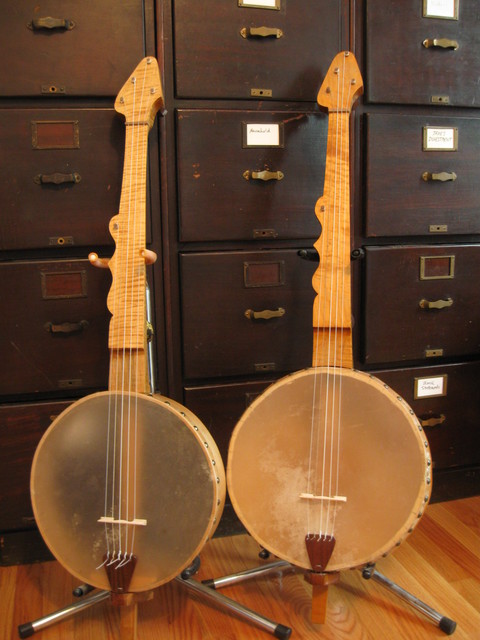
Two Banjos Side By Side
Not a bad outcome. There are differences between the two which are fairly obvious up close, but at a quick glance the banjos look very similar. The neck on the new banjo is a better neck from my point of view. It is straighter and better set up, and the peghead has a slightly different shape that I like better. On the old neck the round part of the peghead meets the neck at a 90 degree angle. On the new neck, I joined the two with a short recurve. All in all, I like the result.
While I was typing this, it occurred to me that this would be a good opportunity to explain the history and purpose of the decorations on the left side of the neck. The double ogee on the left side in the photo is the main design element of the neck. I did not invent that curve. It is a direct copy of a decoration on banjos designed by Wm. E. Boucher circa 1840.
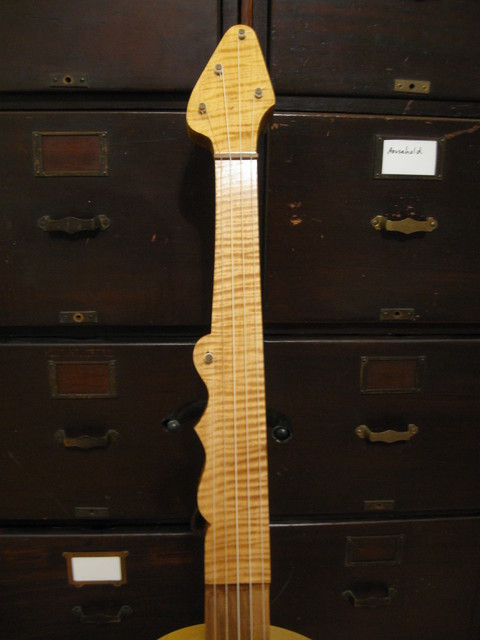
The Boucher Double Ogee
While it looks like the double ogee is mostly a fancy decoration, it has another a purpose as well. The various curves and bumps can be used as fret position markers. This was done purposely when Boucher designed the neck.
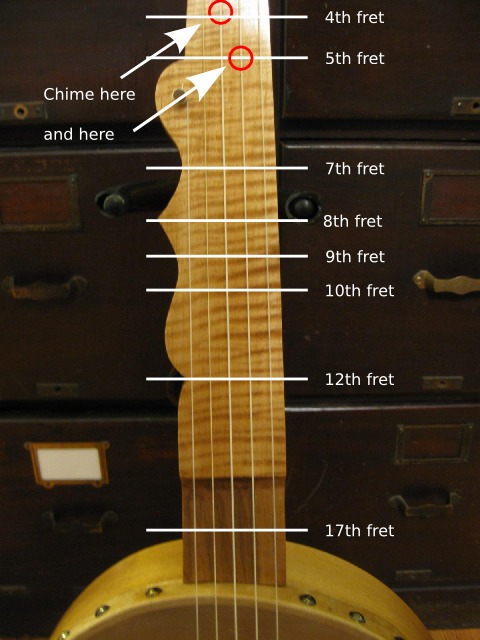
The photo below shows where several important fret positions align with the double ogee scroll.
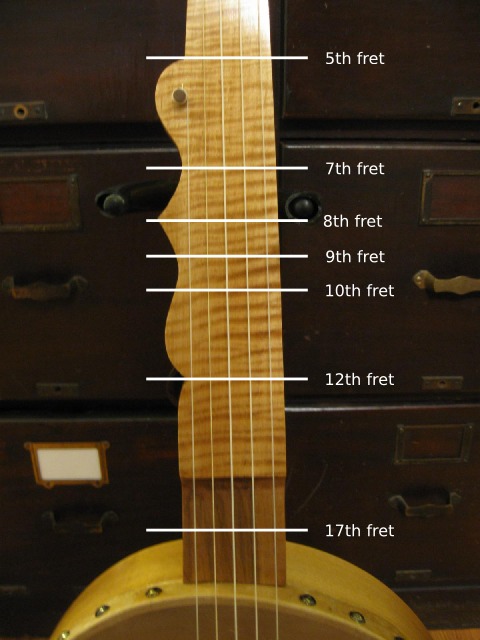
The Fret Locations on the Neck
The fret positions I have marked are there because they have special importance. Lets go through the frets and see what is important about each one.
5th Fret
In the photo you can see that the 5th fret location is just exaclty at the top of the bump that holds the 5th string peg.
The 5th fret is very important. That is where the 5th string usually comes into the neck. Some banjos, like my Deering Goodtime, actually have a railroad spike right behind the 5th fret, and the 5th string is stretched across the 5th fret. A lot of banjos have a 5th string pip right behind the 5th fret that has a notch to hold the 5th string.
If you fret the 1st string at the 5th fret, you get the name note that you tune the 5th string to.
If you chime any string at the 5th fret, you get a note that is two octaves above the fundamental of the string.
Stringbean used to say "There's no money above the fifth fret". I guess he didn't play up the neck much.
You can see that on my neck, the 5th string peg comes in well after the location of the 5th fret, but that is OK. The string is still tuned to the note that I get when I fret the 1st string at the 5th fret.
Actually, I don't tune the banjo that way.... by fretting the strings. I tune it by chiming the strings. I will get to that later, after I finish explaining what each fret position does.
7th Fret
The 7th fret location is located right in the middle of the concave curve that is under the 5th string peg bump.
The 7th fret is also an important fret. It is the next note up from the 5th fret in the diatonic scale. The notes of the major scale are fretted at 0, 1, 2, 4, 5, 7, etc.
If you chime any string at the 7th fret, you get a note that is one octave plus one fifth up from the fundamental note of that string. So, if you chime the 3rd string at the 7th fret, and the 3rd string is tuned to a D, you will get an A, which is an octave plus a fifth up.
D - E - F# - G - A
So chiming a 3rd string at the 7th fret sounds an A, which is the note that the 1st string is tuned to... up one octave.
8th Fret
The position of the 8th fret is right at the sharp point that is under the bump of the 5th string peg. That position isn't used very much. You can't chime the string there, and if you play a scale through the 8th fret it has a very minor/modal sound to it.
It isn't that interesting of a position, but the curve would not be as attractive if that point were moved down to one of the next frets. So I guess it marks the position of the 8th fret because it looks nice that way.
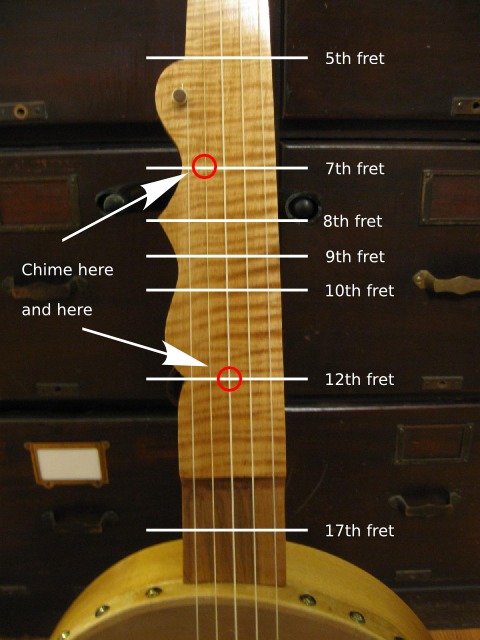
9th Fret and 10th Fret
The positions of the 9th fret and the 10th fret split the center of the next concave curve. This isn't a completely accurate position, but it is close. The actual positions must be fine tuned around that place to get good intonation. But the center of the curve supplies a reference point for learning the notes.
The 9th fret position is the next note in the diatonic scale after the note played at the 7th fret. The 10th fret is, well just the 10th fret. Like the 8th fret it has a modal sound to it. Neither of these two frets chime, but hey, you can't have everything.
12th Fret
The 12th fret location is right at that last dip into the neck before it straightens out again.
The 12th fret is where the string plays one octatve up from the fundamental note of the string. Also, if you chime any string at the 12th position, you get a note that is one octave up from its open pitch.
If you want to adjust the fret positions to align with the curves, move the bridge up and down between the neck and the tailpiece until the octave chime occurs exactly at the notch. The fret positions of the other strings should follow suit if the double ogee was cut properly.
17th Fret
On my neck, the 17th fret is found right in the middle of the frailing scoop. This is unique to my neck, and is not part of the Boucher plan. I cut the frailing scoop into the neck partly because I did not have enough finger board wood to go all the way to the heel, and partly because I wanted a frailing scoop. I wish I could claim that I planned the position this way, but I didn't. It just turned out that the 17th fret position is right in the middle of the frailing scoop.
If you chime the 5th string at the 17th fret, you get the octave. That is because the 5th string is tuned 5 frets shorter than the other strings, so the 17th fret is really the 12th fret for the 5th string.
The other strings do not chime at the 17th fret, however if you fret the 1st string at the 17th fret, you get the octave note that you get by chiming the 5th string at the 17th fret.
There is one other interesting thing about the 17th fret position. That is the position where you can get a really good "Cluck" or "Chuck" sound. That is done by subtly damping the strings with some of your fingers while playing them with others. It makes a muffled, percussive sound that I use in some tunes as a backup sound while I am singing. The muting appears to work best at the 17th fret position... which just happens to be... in the middle of my frailing scoop. So when I want to cluck on the banjo, I move my hand up to the frailing scoop, and there it is.
OK. So much for the fret positions on the double ogee neck.
Oh, and all of these positions work pretty well on my new neck, although the positions move around a bit with the weather. I can adjust the positions somewhat by moving the bridge up and down. And, of course, the final tuning of any played note is done by ear.
The time has come for me to describe how I tune this banjo.
How I Tune the Minstrel Banjo
Back in "the day", before electronic tuners were everywhere, before even pitch pipes were everywhere, back when the double ogee was designed (early 1800's) people didn't worry about tuning to a particular pitch. They tuned the instrument to the singer's voice, and all of the strings were then tuned to their respective intervals by ear. That technique still works if you are playing for a singer or playing by yourself. I do that all the time, occasionally using my tuner to bring the strings back to pitch so that they don't creep too sharp or too flat over time. So, my tuning technique tunes the strings relative to one another, but not necessarily to a particular pitch.
The normal instructions for tuning a fretted banjo call for you to fret one string at a particular fret and then tune another string to that note. But with a fretless banjo, there are no defined frets, so that is difficult to do.
The finest way to tune one of these is to simply tune the strings to their proper intervals with the other strings by ear. But that is difficult for beginners (and even long time players) to learn. After 20 years of playing, I can do some of them that way, but I still get lost often and I have to start over using a tuner.
But, even without frets, it is possible to chime the strings if you know where the relevant fret postions are. So I tune my fretless banjos by chiming a note on one string and tuning the other string to the chimed note.
I tune my minstrel banjos to the traditional D tuning. There are two tunings that are used most often, the "Standard (Low Bass)" tuning and the "High Bass" tuning. Here are the two tunings, listed from the 5th string up to the 1st string.
Low Bass Tuning
- 5th String - D
- 4th String - G
- 3rd String - D
- 2nd String - F#
- 1st String - A
High Bass Tuning
- 5th String - D
- 4th String - A
- 3rd String - D
- 2nd String - F#
- 1st String - A
The only difference between the two tunings is the note that the 4th string is tuned to, G for Low Bass and A for High Bass.
The first string that I tune is the tonic string, which is the 3rd string. By hook or crook, tune the tonic string to the fundamental note of the key, which in this case is the note D. Tune using a tuner, or a piano, or a pitch pipe, or simply to a note that is comfortable to sing. One trick to try is to tune the lowest (4th) string first to the lowest note you can sing and the tune the rest of the strings to their relative pitches from there. That guarantees that the banjo will not go outside your range on the low end. But I am getting ahead of myself. First I will go through tuning starting at the tonic, which is the 3rd string.
After we have tuned the 3rd string to the pitch you want it, we are done with one string; there are four to go.
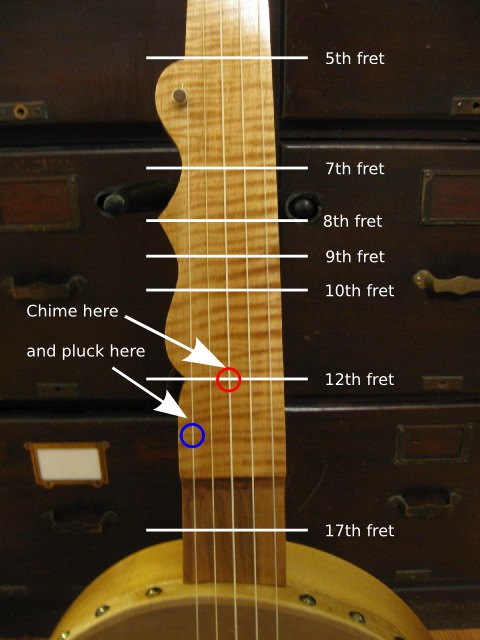
Chime the 3rd string at the 7th fret. That is at the location in the photo below.
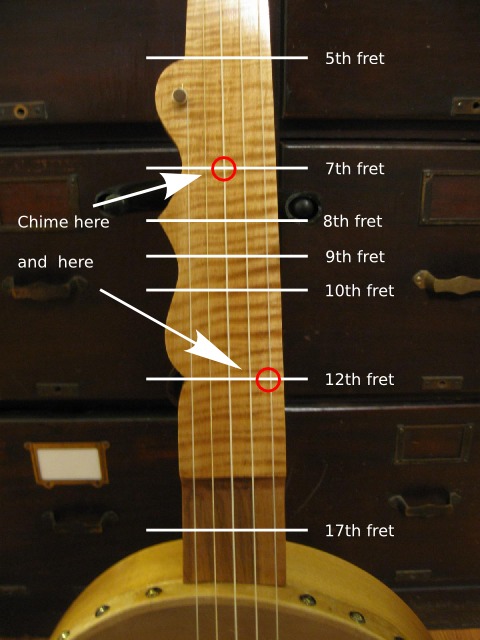
Tune the 1st String to the 3rd String
That gives you a note that is one octave plus a fifth up from the D, which is an A octave. To get the octave A on the 1st string, chime the first string at the 12th fret. If your ear is good enough, you can also just tune the 1st string an octave below the chimed note on the 3rd string. Your choice. I usually go ahead and chime the first string.
Two strings down. Three to go.
Tuning the 2nd string is a bit more difficult. It took me a long time to figure out how to tune the 2nd string because there was no obvious chime I could use in the positions that we have been talking about. However, I did finally find one.
It turns out that there is a chime point around the 4th fret position that will create a note that is two octaves plus one third above the fundamental. It is not exactly at the fourth fret, but actually a little behind it, toward the nut. But it is there. Here is the location in another photo.
Tune the 2nd String to the 3rd String
Notice that there is no easy position marker in the double ogee for the 4th fret position. Shucks.
This is a difficult chime to find. First of all, you have to find the correct location to put your finger, and secondly, it damps almost all of the lower frequency harmonics, leaving only that high harmonic, two octaves plus a third. So as you try to do the chime, mostly what you get is "thump thump thump" instead of the nice, clear bell-like tone.
To make this work what you need to do is to enhance the high end harmonics by plucking the string very near the bridge. It is the higher harmonics that you hear in the chime. As you do that, move your finger around about the 4th fret position and keep doing it until you hear the chime. You do not want the chime that shows up more easily around the 5th fret because that is the double octave. Move your finger slowly back from the 5th fret position toward the nut, plucking the string right near the bridge until the higher chime is heard. Keep trying. It is there.
If you are confused about how the harmonics work, you can read my page on The Compensated Bridge. I have animated pictures and lots of physics equations to show you how all of this works.
Once you have found the chime at the 4th position on the 3rd string, the note is two octaves plus a third up from the fundamental, which just happens to match exactly the double octave that you get by chiming the 2nd string at the 5th fret, because the 2nd string is tuned one third above the 3rd string.
Three strings down. Two to go. Don't get discouraged. The rest are easier.
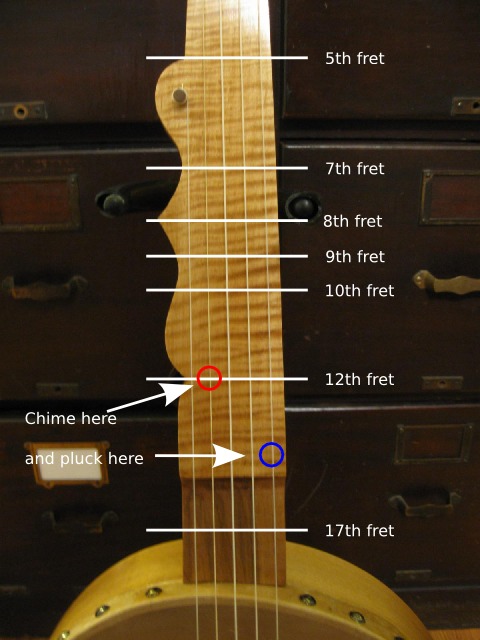
Tuning the 5th string is easy. It is tuned to an octave above the tonic, so just chime the third string at the 12th fret and tune the 5th string to that note. You don't have to chime the 5th string, just pluck it.
Tune the 5th String to the 3rd String
We are down to the last string, the 4th string. For that string we need to make a choice of which tuning we want to do. There are normally two choices, to wit:
- Low Bass (Standard)
- High Bass
The Low Bass tuning used to be considered the "Standard" tuning for minstrel banjos. If you tune to Low Bass with the tonic (3rd string) tuned to G, you have the Drop C tuning. So I guess in the minstrel key of D, you would have a "drop G"?
The High Bass tuning raises the 4th string up a full note from the Low Bass. It is equivalent to the modern open G tuning, which of course in our minstrel key is an open D.
I will start with the Low Bass. In the Low Bass tuning, the 4th string is tuned one fifth below the tonic, which is what the 3rd string is tuned to. To do that, you simply chime the 4th string at the 7th fret position to get the octave plus a fifth and then tune that note to the octave note you get by chiming the 3rd string on the 12th fret.
Tune Low Bass on the 4th String
In the High Bass tuning, the 4th string is tuned to a fourth below the tonic. That is the same note that you tune the 1st string to. It is actually one octave below the note that you tune the 1st string to. So chime the 4th string at the 12th fret to get the octave, and tune it to the plucked note of the 1st string.
Tune High Bass on the 4th String
That is it. All the strings have been tuned relative to one another, and no frets were required. It was all done by chiming notes on other strings. It sounds complicated when you read through all of that explanation, but once you do it a few times, it is simpler than getting out the electronic tuner. Here is the procedure boiled down to its essence.
Tuning the Minstrel Using Chimes
- Tune the 3rd string to desired pitch.
- Chime the 3rd string at 7th fret and tune the 1st chimed at the 12th.
- Chime the 3rd string at 4th fret and tune the 2nd chimed at the 5th.
- Chime the 3rd string at the 12th and tune the 5th plucked.
- (Low Bass)Chime the 4th string at the 7th and tune it to the 3rd chimed at 12th.
- (High Bass)Chime the 4th string at the 12th and tune it to the 1st string plucked.
That is all there is to it. Happy tuning.
